NestJS API with Cypress API Testing
Getting Started
Greetings, friend! This tutorial will cover creating an API using the NestJS framework. Along the way, we will build out the application using tests with Cypress and the Cypress API Plugin.
If you are unfamiliar with NestJS, it is a Node-based framework heavily influenced by Angular and is great for building any server-side application. What I like about Nest is that it provides building blocks (similar to those found in Angular) for creating applications. This helps those familiar with Nest and how it works to jump from project to project and know roughly how things already work.
Cypress is typically known for end-to-end testing web applications, as well as component testing. With the Cypress API Plugin, we can also use Cypress to test our backend applications. The plugin provides a nice interface showing each API call's results. Typically I would reach for something like Postman to use when I develop APIs, but with Cypress, I can nearly replace Postman and have a nice suite of automated tests to go along with it when I'm done.
For this tutorial, we are creating a mission board for a fictional agency called Cypress Heroes. This board will feature a list of our heroes' missions. We'll be able to get, create, update, and delete missions on the board. Yes, it's a to-do list, but it's much cooler because, you know, superheroes.
To get started, you will need to have a relatively newer version of Node installed and a code editor (like VS Code).
Create Nest Application
The first thing we will do is install the Nest CLI tool:
npm i -g @nestjs/cli
Next, use the CLI to create a new application:
nest new cypress-heroes-api
When prompted, select NPM as your package manager.
Go into the newly created cypress-heroes-api directory and install Cypress and the plugin:
npm i -D cypress cypress-plugin-api
Next, open the project in your code editor (we'll be using VS Code in the tutorial):
code .
Configure Cypress
Before we start working on the API, let's get Cypress up and running and write our first test. The test won't pass yet, but that's okay.
Launch Cypress:
npx cypress open
Select End-to-End testing, and go through the next few steps. Cypress will configure your project by creating all the files necessary for it to run. While we won't be doing end-to-end testing exactly, it's the most appropriate place to do API testing.
After the setup is done, update the cypress.config.ts file to add the
baseUrl option. We'll set it to "http://localhost:3000", which is what our
Nest application will serve the API locally during development.
e2e: {
  baseUrl: 'http://localhost:3000',
  setupNodeEvents(on, config) {
    // implement node event listeners here
  },
},
While we are at it, we will import the cypress-plugin-api package into the
cypress/support/e2e.ts so it is available to use in our specs. Throw the
following towards the top of the file with any other imports:
import 'cypress-plugin-api';
If you go back to Cypress, you'll see a warning that it can't verify the server is running. This hints that we still need to start up our server. Let's go ahead and do so:
npm run start:dev
You will likely need to open several command windows or tabs to run Cypress and Nest simultaneously. In VS Code, I like to run Nest in a JavaScript Debug Terminal, which will attach the debugger to the process automatically.
Go back to Cypress, and hit the "try again" button on the section that warned us about the server not running. It should go away, and you can hit "Start E2E Testing".
Hit the "Create new empty spec" button, name the spec missions.cy.ts, and run it. This will create a default spec that visits a test site, but we'll soon update it to contain all the tests we write for the missions API.
Open up the cypress/e2e/missions.cy.ts file and replace its contents with the following:
describe('missions api', () => {
  it('should get missions', () => {
    cy.api('/missions').as('response');
    cy.get('@response').its('status').should('equal', 200);
  });
});
Our first test (denoted in the it() block) will use the cy.api() method
(provided by the cypress-plugin-api package) to make a request to the
"/missions" endpoint. We'll use the
as() method to
alias the
result of the request. Aliasing in Cypress is how we store variables to
access them later.
Which is exactly what we do on the next line. The cy.get('@response') call
get's the response variable, and the its(status) call gets the status property
on the response object. This is the HTTP status code returned back from the API.
In the test, we want to verify that the code returned 200 for a successful
call. We might consider this the "it works!" of API tests.
Save the spec and go back to the Cypress test browser. The spec will fail, but we expected it to since we have yet to implement any API. Let's do so now!

Getting Missions
Nest Missions Controller
Now, let's start to build out the API. The first thing we will need is a Nest controller. Controllers are responsible for listening and responding to HTTP requests. We can use the Nest CLI to generate a missions controller for us:
nest g controller missions
Now we have a basic controller scaffolded at src/missions/missions.controller.ts:
import { Controller } from '@nestjs/common';

@Controller('missions')
export class MissionsController {}
Controllers are plain JavaScript objects that are decorated with the
@Controller decorator. The decorator adds meta-data to the class that the
framework uses to determine which controller will respond to which HTTP
request. In this case, the MissionsController will respond to requests
that go to the "/missions" route (denoted by the parameter passed into the
controller).
The Nest CLI also modified the app.module.ts file for us, adding in the
MissionsController to the controller's array.
@Module({
  imports: [],
  controllers: [AppController, MissionsController],
  providers: [AppService],
})
export class AppModule {}
Our first API will be to return back a list of missions. Let's start simple and return back a hard-coded array:
@Get()
getList() {
  return [
    {
      description: 'save the world',
      complete: false,
    },
  ];
}
The @Get() decorator instructs Nest that the getList() method will respond
to HTTP GET methods. What gets returned from the method is what will be in the
response's body, automatically serialized as JSON. We can return something
synchronous as we do above, or if we return an async value (like a promise or
RXJS observable), then the value yielded from the async response will be in the
body.
Back in the test runner, hit the "Run all specs" button to try the test again. This time the test will pass:
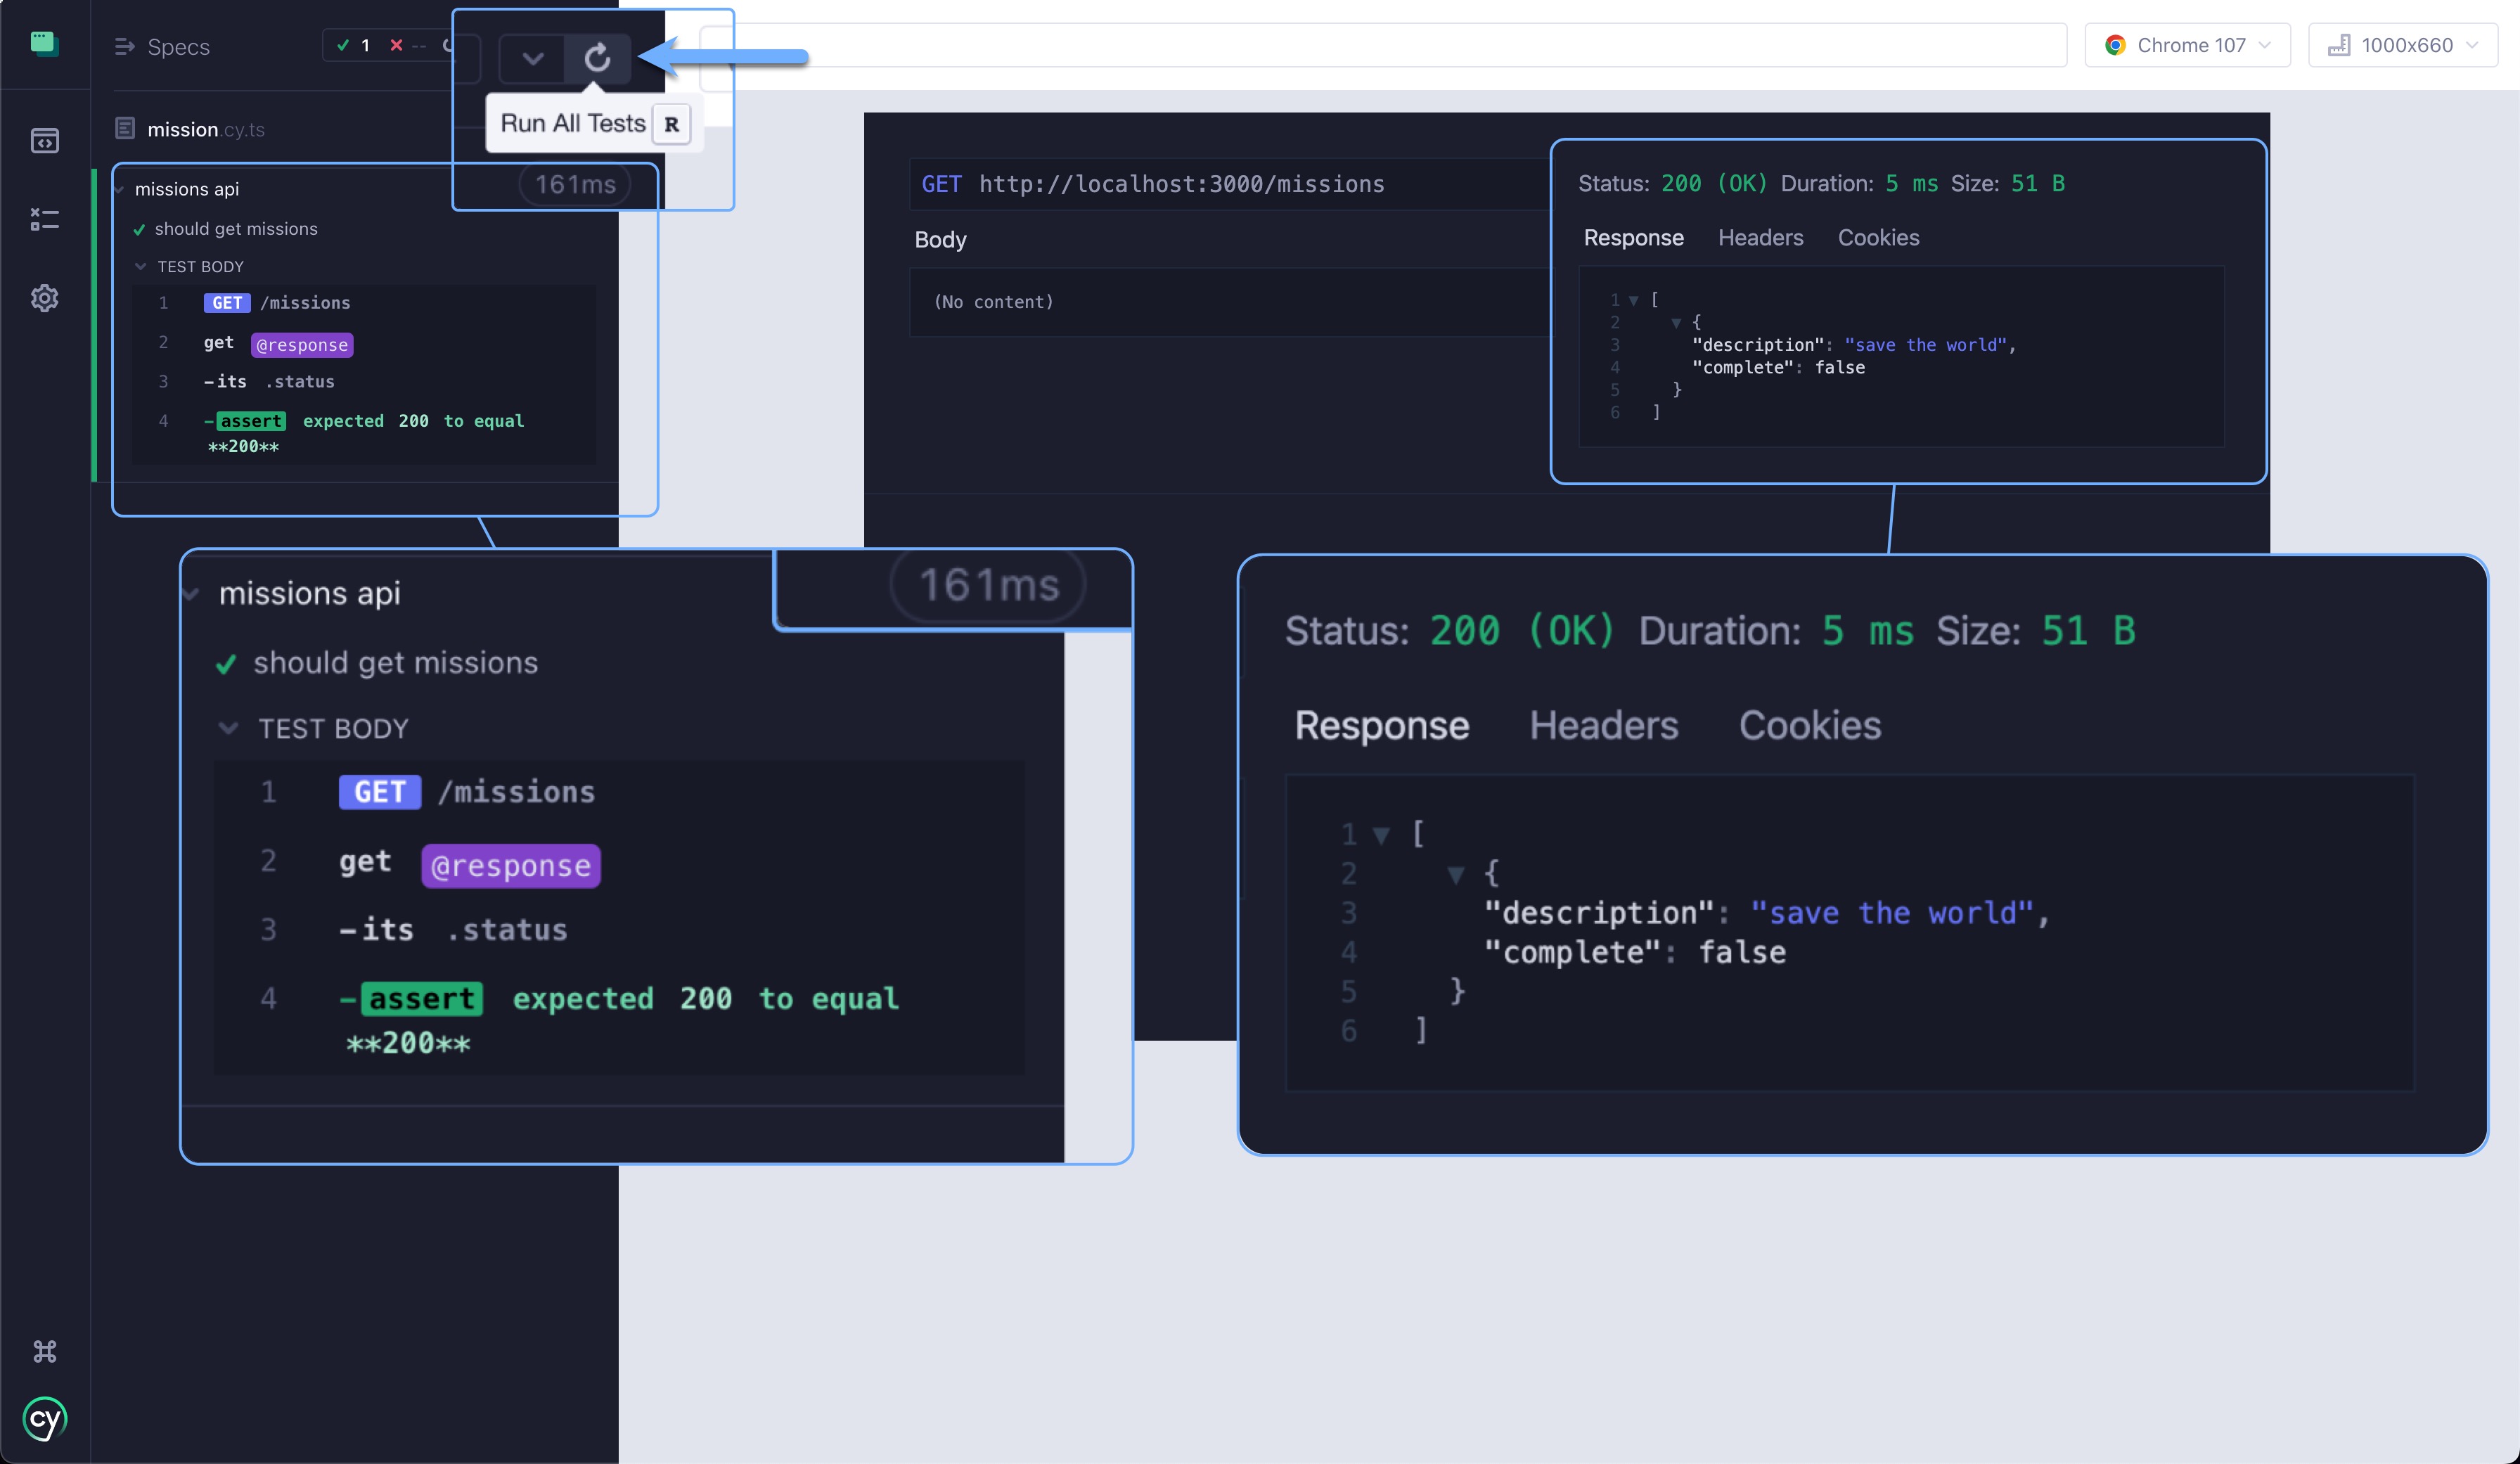
On the right, we can see the results and browse through the returned response (our hard-coded missions array), the headers, and cookies.
Great stuff, but we normally don't return back hard coded data. Much like Angular, Nest has the concept of services that are responsible for any type of business logic and communicating with other systems.
Nest Missions Service
Instead of using the hard-coded array, we will create a service responsible for handling all the mission data. Run the following command to create a new service from the Nest CLI:
nest g service missions
This will create a missions.service.ts file for us:
import { Injectable } from '@nestjs/common';

@Injectable()
export class MissionsService {}
A service is a JavaScript class marked with a decorator like a controller.
Angular devs will find Nest services very similar to their NG counterparts.
Unlike an Angular service, though, Nest doesn't have a providedIn option, so
the service has to be registered in a module (which the CLI already added to the app
module for us).
Let's refactor the code and return the missions from the service instead. First update the service with the following:
import { Injectable } from '@nestjs/common';

export interface Mission {
  id?: number;
  description: string;
  complete: boolean;
}

const defaultMission: Mission = {
  id: 1,
  description: 'save the galaxy',
  complete: false,
};

@Injectable()
export class MissionsService {
  missions: Mission[] = [{ ...defaultMission }];

  getList() {
    return this.missions;
  }
}
Above, we first define a Mission interface that will be the data structure for
the missions. It will have an id with an optional type of number, a
description with a type of string, a complete with a type of boolean, and a
created with a type of string that will contain an ISO date string of when the mission was added.
Next, we define a default mission we will use to seed the database.
Speaking of databases, to keep things simple, we won't be using a real one here. Instead, we'll be using an in-memory array that I'll lovingly refer to as
ArrayDB™️. Therefore, each time we update the Nest app and it
recompiles/relaunches, we'll lose any modifications. Thus, we'll set the array
to contain the defaultMission when the service initializes. In a real app, we
would instead call into a data layer or ORM like TypeORM
or Prisma to manage data.
The getList() method returns everything currently in the array.
Next, update the controller to get a reference to the service via
dependency injection
(just like Angular!). Then, update the getList method to return the call from
the service instead of the hard-coded array:
import { Controller, Get } from '@nestjs/common';
import { MissionsService } from './missions.service';

@Controller('missions')
export class MissionsController {
  constructor(private missionsService: MissionsService) {}

  @Get()
  getList() {
    return this.missionsService.getList();
  }
}
Now we can rerun the test, and if we see the description of the mission come back as "save the galaxy" (versus "save the world"), we know the API is returning data back from the service.
Get Single Mission
Next, let's update the API to be able to retrieve a specific mission via its
id. We'll specify the id via a route param appended to the end of the URL like
'/missions/1'.
First, add a test:
it('should get single mission', () => {
  cy.api('/missions/1').as('response');
  cy.get('@response').its('status').should('equal', 200);
  cy.get('@response').its('body').should('include', {
    id: 1,
    description: 'take out the trash',
    complete: false,
  });
});
This test starts much like the last one, except we specify we want to pull back the mission with the id of 1 (the default mission). After we assert the request comes back successfully (by ensuring the status code is 200), we check that the response's body includes the mission we expect.
Update the service to add a get method, which will use ArrayDB™️'s find method to retrieve the mission if it exists, else it will just return undefined:
get(id: number) {
  const mission = this.missions.find(x => x.id === id);
  return mission;
}
@Get(':id')
get(@Param('id', ParseIntPipe) id: number) {
  return this.missionsService.get(id);
}
ParseIntPipe is imported from "@nestjs/common"
Let's go over what's new here. First, the @Get() decorator is taking in a
string param, which is an additional path in the URL that the controller should
look for in addition to the URL prefix that's supplied in the @Controller()
decorator in the class. Here, we are specifying ":id". When we prepend a colon
to the string like we did, we are saying we are looking for a dynamic portion of
the string, and when matched, store it in a variable that is named by what
comes after the colon.
In our case, we are going to store the mission id (as our path is
/missions/{id}), into a variable named "id". In the get() method, we have a
method argument named id, but before it, we are using the @Param() decorator.
This decorator instructs Nest to look for the variable name passed into it and
bind it to the argument.
Since parameters coming in from the URL are all strings, we can use a mechanism
built into Nest known as pipes to transform the
value on the way in. Above, we use the ParseIntPipe to convert the value to a
number, which our service will need when looking up the mission.
Next, let's add a test that shows when we request a mission that doesn't exist, the API should return a 404 not found error. We'll do so by passing in an id of 100 to the missions endpoint:
it('should throw 404 if single mission is not found', () => {
  cy.api({
    url: '/missions/100',
    failOnStatusCode: false,
  }).as('response');
  cy.get('@response').its('status').should('equal', 404);
});
By default, calls to
cy.api()will fail if they don't return a success status code in the 200 range. Above, we expect the code to be 404, so we turnfailOnStatusCodeto false in the options so it won't fail.
If you run the test, you will see it currently fails. Even though we don't get a mission back, the status code is 200.
Nest provides a
set of exceptions
that we can throw in certain scenarios to return back appropriate status codes.
One of which is the NotFoundException. We can throw this error anywhere in the app, and a global exception filter will catch it and return back a
response with a 404 status code.
In the MissionsService, we will check to see if we find a mission when we
query ArrayDB™️ for it. If we don't, we'll throw a NotFoundException and let
Nest handles the dirty work from there:
get(id: number) {
  const mission = this.missions.find((x) => x.id === id);
  if (!mission) {
    throw new NotFoundException();
  }
  return mission;
}
NotFoundExceptionis imported from "@nestjs/common"
Add Mission
Next up, let's add new missions to the list. To add a mission, we will use the "POST" HTTP method to the missions endpoint, and set the request's body with the new mission. We'll expect the result of the API request to be the new mission created.
Add the following test:
it('can add mission', () => {
  const mission = {
    description: 'test mission',
    complete: false,
  };
  cy.api('POST', '/missions', mission).as('response');
  cy.get('@response').its('status').should('equal', 201);
  cy.get('@response').its('body').should('include', mission);
});
The only thing we haven't seen above is passing the new mission as an
object to the third parameter of the cy.api() method. The method will
serialize the object as JSON and set it to the request's body, as well as set
all the necessary headers.
Update the MissionsService to include the addMission method:
add(mission: Mission) {
  const newId = Math.max(...this.missions.map((x) => x.id)) + 1;
  mission.id = newId;
  this.missions.push(mission);
  return mission;
}
Here, we take the new mission, and since ArrayDB™️ doesn't have auto-incrementing ids, we need to calculate a new id on our own. After that, we use the push method to add the new mission to the list and then return it.
Next, add the controller method:
@Post()
addMission(@Body() mission: Mission) {
  return this.missionsService.add(mission);
}
Post and Body are imported from "@nestjs/common"
There are a couple of new things to note above. First, the @Post() decorator
states that this will be the method that will response to "POST" HTTP methods.
Next is the new @Body() decorator. This instructs Nest to take the contents
from the body of the request and serialize it into the parameter it is attached
to. Hence, the mission variable will contain the new mission to add.
Run the add mission test again, and you should see it pass with a 201 status code, which represents a new entity created due to the request.
Update & Delete Missions
Now that we are starting to get the hang of this let's bang out the last two methods we are going to want: updating and deleting.
First, the tests:
it('should update mission', () => {
  const mission = {
    description: 'get cat out of tree',
    complete: true,
  };
  cy.api({
    url: '/missions/1',
    method: 'PUT',
    body: mission,
  }).as('response');
  cy.get('@response').its('status').should('equal', 200);
  cy.get('@response').its('body').should('include', mission);
});

it('can delete mission', () => {
  cy.api('DELETE', '/missions/1').as('response');
  cy.get('@response').its('status').should('equal', 204);
});
The service code:
update(id: number, mission: Mission) {
  mission.id = id;
  this.missions = this.missions.map((x) => {
    return x.id === id ? mission : x;
  });
  return this.get(id);
}

delete(id: number) {
  this.missions = this.missions.filter((x) => x.id !== id);
}
And the controller code:
@Put(':id')
updateMission(
  @Param('id', ParseIntPipe) id: number,
  @Body() mission: Mission,
) {
  return this.missionsService.update(id, mission);
}

@Delete(':id')
@HttpCode(204)
delete(@Param('id', ParseIntPipe) id: number) {
  this.missionsService.delete(id);
}
Put, Delete, and HttpCode are imported from "@nestjs/common"
Pretty standard stuff that you've seen already. The @Put() and @Delete()
decorators make these methods listen for their respective HTTP methods.
The only new thing is the @HttpCode() decorator on the delete() method. By
default, Nest will return back a 200 status code for all HTTP methods except for
"POST", which it will return 201 for. To change the default, use this decorator.
In our case, we are using status code 204, which means we are not returning any
content, and that is to be expected. Notice how we are not returning anything
from this method.
The first time we run these tests, they will pass. However, on the next run, we will get some failures. This is because some tests expect the database to be in its default state, but we are now modifying it with the add, update, and delete methods.
It is best practice to not have one test reflect the outcomes of another test, but that is exactly what we are doing currently. What can we do about it?
One method is resetting the database into a known state before running each test. This is often difficult to do, but we have that luxury because our database is so small. Let's see how we can accomplish that.
Seeding the Database
The technique we are going to use here is having a method in our API that will
reset the database back to its initial state. The first thing we will do is have
a method in the MissionsService to reset the ArrayDB™️:
reset() {
  this.missions = [{ ...defaultMission }];
}
Above, we are overriding the array by setting it to an array that only
contains the defaultMission, just like when the API first initializes.
Next, we'll create a method in the controller our tests can call to reset:
@Post('/reset')
reset() {
  if (process.env.NODE_ENV === 'test' || process.env.NODE_ENV === 'dev') {
    this.missionsService.reset();
  }
}
We'll make the method respond to a "POST" request since its changing state inside the system. We also check to ensure that the environment is either "test" or "dev", as we don't want to call this method available in production. We need to update the "start:dev" script in the package file to set the Node environment.
"start:dev": "NODE_ENV=dev nest start --watch",
Make sure you restart the Nest server so the change can take effect.
A bit later, we will take a look at how to secure this endpoint even more so that the calling API will need a token to call it.
In the tests, we want to ensure that we reseed the database before each
test is run. We can use the
beforeEach
test hook for that. Add the following block inside the describe block before
the first test:
beforeEach(() => {
  cy.request({
    log: false,
    method: 'POST',
    url: '/missions/reset',
  });
  cy.log('seeding db');
});
Above, we use the cy.request() command, the built-in command for
making API requests in Cypress. We set logging to false so it doesn't get too
noisy in the command log, but we also output a small "seeding db" message, so we can see it's happening.
The technique above is just one strategy for seeding a database for testing, there are many ways to do so, and some will be more appropriate for others in your app. See the Cypress guide on seeding data for some more info on the subject.
Now you should be able to run the tests over and over again without the state of the previous test is getting in the way.
Protecting Routes
Above, in the reset() method on the controller, we put one safeguard in place
to ensure the app wasn't in production when trying to reseed the database.
Let's add another layer of security by requiring the calling client to provide a
token to prove they have access to do a db reseed.
To accomplish validating this token, we will use a Nest Guard, which is a piece of middleware which Nest can invoke for each HTTP request before passing the request on to the controllers.
First, we will use the CLI to create a guard for us. We'll call it
TestEnvOnly:
nest g guard TestEnvOnly
A guard is another JavaScript class with one required method, canActivate.
This method determines if the request should be able to proceed through the
pipeline or not by returning a boolean or a promise/observable that yields a
boolean value.
Update the contents of the newly created src/test-env-only/test-env-only.guard.ts file with the following:
import { CanActivate, ExecutionContext, Injectable } from '@nestjs/common';
import { Observable } from 'rxjs';

@Injectable()
export class TestEnvOnlyGuard implements CanActivate {
  canActivate(
    context: ExecutionContext
  ): boolean | Promise<boolean> | Observable<boolean> {
    const request = context.switchToHttp().getRequest();

    if (!(process.env.NODE_ENV === 'test' || process.env.NODE_ENV === 'dev')) {
      return false;
    }

    if (request.headers.authorization !== 'resetcreds') {
      return false;
    }

    return true;
  }
}
In the canActivate method, the first thing we do is grab access to the HTTP
request.
Next, we move the code to check the environment from the controller reset()
method, and then we check an authorization header has the correct token.
We are using a simple string here, but this token could be more complex, like a
JWT or API key that could be validated.
If either of the above checks doesn't pass, we return false, instructing Nest to end the request and send back a 403 Forbidden status code. We return true if they are both good, and the request will continue to the controller.
Unlike when we generated the Nest service and controller, the guard did not
automatically get wired up for us in the app module. That's because the way you
use guards can either be global or more granular. We only want to apply the
guard to the reset() method, so we can use the @UseGuards() decorator and
pass the TestOnlyGuard as a parameter to it:
a
@UseGuards(TestEnvOnlyGuard)
@Post('/reset')
reset() {
  this.missionsService.reset();
}
UseGuards is imported from "@nestjs/common" TestEnvOnlyGuard is imported from "src/test-env-only/test-env-only.guard"
Nest will now use the guard for each request coming into this method.
If you try the tests again, you will see them fail because we aren't passing the
token on the "reset" request in the beforeEach. Update the block to do so:
beforeEach(() => {
  cy.request({
    log: false,
    method: 'POST',
    url: '/missions/reset',
    headers: {
      Authorization: 'resetcreds',
    },
  });
  cy.log('seeding db');
});
Visit the Nest docs for more ways to bind guards to your application.
We use a guard here to protect our database, but you will also use guards to implement authentication to validate who users are. They even include some built-in ones to get you up and running quickly. Visit their authentication guide for more info.
Validation
We have a working API to manage our missions. However, we haven't done anything to ensure that the data coming into our system is valid. Validating data coming into your system is important because it helps ensure the integrity of your database, helps with security and provides a better developer experience for those consuming your API.
Our Mission model is fairly simple, but let us add some validation to it to
ensure that any time one is added or updated, we make sure it's good.
First up, a new test to validate that trying to create an invalid module returns a 400 Bad Request status code, which signifies to the user they did something wrong with the request. The body of the response will contain helpful messages on what went wrong:
it('when adding an invalid mission, get 400 error', () => {
  const mission = {};
  cy.api({
    method: 'POST',
    url: '/missions',
    body: mission,
    failOnStatusCode: false,
  }).as('response');
  cy.get('@response').its('status').should('equal', 400);
  cy.get('@response')
    .its('body')
    .should('deep.include', {
      message: [
        'description must not be an empty string',
        'description must be a string',
        'complete must be a boolean',
      ],
    });
});
We will be using a couple of helper libraries to help accomplish this. Class Validator and Class Transformer are two libraries that fit well in the Nest ecosystem. They allow us to use TypeScript decorators to annotate our models and provide validation logic declaratively.
We need to install the libraries. Run the following from your terminal:
npm i class-transformer class-validator
Currently, our Mission model is an interface. To annotate it with
decorators, we will need to convert it to a class instead and refactor some
code.
Create a new file at src/missions/Mission.ts and paste the following into it:
export class Mission {
  id?: number;
  description: string;
  complete: boolean;
  created: string;

  constructor(partial: Partial<Mission>) {
    Object.assign(this, partial);
  }
}
Next, delete the Mission interface from the top of the missions.service.ts
file and reference the new class in both the service and controller.
And then, to make sure we are using an instance of the class, update where we
initialize the missions array in the service, as well as where it gets reset in
the reset() method:
//initialize missions
missions: Mission[] = [new Mission(defaultMission)];

//reset
reset() {
  this.missions = [new Mission(defaultMission)];
}
Perfect! Now that we have a class, we can begin to decorate the Mission class
with validation functions. We'll verify that description is a string and
is not empty and that complete is a boolean. To do so, we'll use the
@IsString(), @IsNotEmpty(), and @IsBoolean() decorators. Update the
Mission class and add the validators to the description and complete
properties:
import { IsString, IsNotEmpty, IsBoolean } from 'class-validator';

export class Mission {
  id?: number;

  @IsString({ message: 'description must be a string' })
  @IsNotEmpty({ message: 'description must not be an empty string' })
  description: string;

  @IsBoolean({ message: 'complete must be a boolean' })
  complete: boolean;
  created: string;
}
@IsString, IsNotEmpty, and IsBoolean are imported from "class-validator"
Each decorator takes a set of options, and we can set the error message we want to use if the validation fails.
Now that the decorators are in place, how do we use them? Nest has another piece of middleware known as pipes (similar to the guards which we used above) whose job is to inspect incoming requests and provide validation and transformation to the request. You can see an example of how one is built here. However, Nest already has a built-in ValidationPipe, which does exactly what we need it to.
We'll want every API request to be run through the ValidationPipe, so instead
of granularly applying it to methods as we did above with @UseGuards(),
we'll configure it in the app module. Update the src/app.module.ts file to
add a new item in the providers array:
@Module({
  imports: [],
  controllers: [AppController, MissionsController],
  providers: [
    AppService,
    MissionsService,
    {
      provide: APP_PIPE,
      useValue: new ValidationPipe({ transform: true }),
    },
  ],
})
export class AppModule {}
APP_PIPE is imported from "@nestjs/core" and ValidationPipe is imported from "@nestjs/common"
This will instruct Nest that anytime a request is made to run the request
through ValidationPipe, which will parse the request body, convert it to an instance of the Mission class, and run any validators on it through
class-validator. If validation fails, then it will return back a 400 status
code.
With all that in place, our test should now pass.
You might have noticed that we passed in {transform: true} as an option to the
ValidationPipe class. This will convert any values to how they are typed in
TypeScript on its way in. This means that we can now remove any of those
ParseIntPipes were being used to convert the ids into strings. Go ahead
and do so and you'll see that all the tests still pass!
Exclude properties
Okay, one last cool trick to show you before we wrap up is introducing the concept of Nest Interceptors. An interceptor is another piece of specialized middleware, and its purpose is to transform any responses on their way out (opposite of a pipe).
In our Mission class, we've had the created date that shows when the mission
was added. Let's pretend this info is only somewhat valuable to the clients of
the API, and we want to remove it before it gets sent out.
Add another check to the 'should get single mission' test to make sure the the property comes back undefined:
it('should get single mission', () => {
  cy.api('/missions/1').as('response');
  cy.get('@response').its('status').should('equal', 200);
  cy.get('@response').its('body').should('include', {
    id: 1,
    description: 'save the galaxy',
    complete: false,
  });
  cy.get('@response').its('body.created').should('be.undefined');
});
The test will currently fail because created comes back.
To exclude the property, we can use the @Exclude() decorator from
class-transformer:
@Exclude()
create: string;
Exclude is imported from "class-transformer"
When a class is run through class-validator, it will convert the object into a
plain JavaScript object and run any transformations on it (such as excluding
properties). We can use the the built-in
ClassSerializerInterceptor
from Nest to do this for us.
To use the interceptor, add another provider to the app module:
providers: [
  AppService,
  MissionsService,
  {
    provide: APP_PIPE,
    useValue: new ValidationPipe({ transform: true }),
  },
  {
    provide: APP_INTERCEPTOR,
    useClass: ClassSerializerInterceptor,
  },
],
APP_INTERCEPTOR is imported from "@nestjs/core" and ClassSerializerInterceptor is imported from "@nestjs/common"
Now the 'should get single mission' test should pass again.
Conclusion
Thanks for taking the time to work through this tutorial. Hopefully, I showed you how to get up and running with Nest quickly and how to use Cypress with the Cypress API Plugin as a development aid while building out your API. The extra benefit is that you also have a set of repeatable tests to run to ensure your API functions as it should.
Feel free to hit me up on Twitter @elylucas if you have any questions.
Happy Coding!