Socket Connections
In the first lab, we saw how the various pieces of Socket.io and Nest fit together to establish a real-time connection to the Angular client. In this lab, we will take it a step further and properly organize the code into services that will separate areas of concern.
Let's start by building out the server side.
Nest
On the server side, the Nest ChatService will be responsible for maintaining
the state and the ChatGateway will be responsible for communicating with the
client.
ChatService
To start building out the ChatService, we'll be adding a few methods to keep
track of users when they connect and disconnect from the app.
Open the ChatService file and replace its contents with:
import { Injectable } from '@nestjs/common';

@Injectable()
export class ChatService {
  users: Record<string, string> = {};

  identify(user: string, clientId: string) {
    this.users[user] = clientId;
  }

  disconnect(clientId: string) {
    //look up user by clientId:
    const users = Object.keys(this.users);
    let userToRemove = '';
    users.forEach((user) => {
      if (this.users[user] === clientId) {
        userToRemove = user;
        return;
      }
    });
    if (userToRemove) {
      delete this.users[userToRemove];
    }
    return userToRemove;
  }
}
The identify method will get called immediately after the user makes a
websocket connection. Its purpose is to keep track of the user's clientId,
which is randomly generated each time a client makes a new connection. In your
applications, you will want a way to associate a clientId with a user, as you
will need the clientId to send individual messages to users. Our chat app uses
a plain JavaScript object where the user's name will be the key and the
clientId the value.
The gateway will call the disconnect method when a websocket loses its
connection. When the disconnect happens, we only get the clientId, which we
then search through the users map to locate the user by the clientId, and if
we find one, we remove the association.
ChatGateway
Update the ChatGateway to the following:
import { SubscribeMessage, WebSocketGateway } from '@nestjs/websockets';
import { ChatService } from './chat/chat.service';
import { Socket } from 'socket.io';

@WebSocketGateway({ namespace: 'chat', cors: true })
export class ChatGateway {
  constructor(private chatService: ChatService) {}

  @SubscribeMessage('identify')
  async handleIdentify(client: Socket, user: string) {
    this.chatService.identify(user, client.id);
  }

  @SubscribeMessage('disconnect')
  async handleDisconnect(client: Socket) {
    this.chatService.disconnect(client.id);
  }
}
We learned how to set up a gateway using the @WebsocketGateway and
@SubscribeMessage decorators in the last lab. One subtle difference, though,
is we are specifying a namespace for our connection. Namespaces are a lot like
paths in the URL for HTTP connections. When we specify a namespace, this gateway
will only be responsible for messages that get passed to this namespace.
The handleIdentify method will be called by the client immediately after
making a connection. We grab the clientId off the socket and pass it to the
service to keep track of the user.
The handleDisconnect method is a lifecycle event of Socket.IO and
automatically gets called when the client disconnects. In this instance, we
collect the clientId and pass it to the ChatService to remove the user from
our list of currently connected users.
With the Nest files set up, let's shift our focus to the client side.
Angular
On the client side, the Angular ChatService will be responsible for setting up
the Socket.IO connection with the backend and maintain client-side state of our
app.
ChatService
The ChatService will be handling a bit of data, and we will be storing that
state using RXJS
BehaviorSubjects.
BehaviorSubject is a good choice for real-time data because we can notify any
subscribers when the data is changed, and they are guaranteed to get a value
upon subscription.
We could return each piece of data as its own observable, which could get
cumbersome for our subscribers. So instead, we'll combine all the
BehaviorSubjects into a single observable and expose it through a
getChatAppData() method.
Update the ChatService with the following:
import { Injectable } from '@angular/core';
import { BehaviorSubject, combineLatest, map, Observable } from 'rxjs';

export interface ChatAppData {
  connected: boolean;
  user: string;
}

@Injectable({
  providedIn: 'root',
})
export class ChatService {
  private connected$ = new BehaviorSubject(false);
  private user$ = new BehaviorSubject('');

  constructor() {}

  getChatAppData(): Observable<ChatAppData> {
    const data = combineLatest([this.connected$, this.user$]).pipe(
      map((value) => {
        const [connected, user] = value;
        return {
          connected,
          user,
        };
      })
    );
    return data;
  }
}
The ChatAppData interface defines what data the service exposes. We will start
off with a boolean connected property, which defines if there is a current
Socket.IO connection, as well as a user property, which will contain the
user's name. We'll be adding to this data structure more in the following
lessons.
Next, we define two class members, connected$ and user$, which are
BehaviorSubjects and maintain the value for their respective variables from
ChatAppData.
In the getChatAppData method, we use RXJS's combineLatest function to
combine all the BehaviorSubjects into a single observable that can be subscribed
to once.
Now that the state is set up, let's add the code required to establish a connection and update the values.
Modify the ChatService, adding or updating the highlighted lines (some
existing code omitted for brevity):
import { io, Socket } from 'socket.io-client';

export interface ChatAppData {
  connected: boolean;
  user: string;
}

@Injectable({
  providedIn: 'root',
})
export class ChatService {
  private connected$ = new BehaviorSubject(false);
  private user$ = new BehaviorSubject('');
  private url = 'http://localhost:3000/chat';
  private client: Socket;

  constructor() {
    this.client = io(this.url, { autoConnect: false });

    this.client.on('connect', () => {
      this.client.emit('identify', this.user$.value);
      this.connected$.next(true);
    });
    this.client.on('disconnect', () => {
      this.connected$.next(false);
    });

    const user = localStorage.getItem('user') || '';
    if (user) {
      this.connect(user);
    }
  }

  connect(user: string) {
    if (this.client.connected) {
      return;
    }
    localStorage.setItem('user', user);
    this.user$.next(user);
    this.client.connect();
  }

  disconnect() {
    localStorage.removeItem('user');
    this.client.disconnect();
    this.user$.next('');
  }

  // getChatAppData omitted for brevity
}
First, we add a url member that contains the URL to connect to. Notice the URL
ends with "/chat", which specifies the namespace and corresponds to what was set
up in the Nest gateway on the @WebSocketGateway().
Next, we create a client socket, which gets initialized in the constructor. We
specify that we don't want to immediately make the backend connection by
specifying the autoConnect flag as false. We delay the connection until the
user enters their name and hits the connect button in the UI.
After the client is defined, we subscribe to a couple of events.
The connect event is a lifecycle event that gets called automatically on a new
connection or reconnection. After an established connection, we fire the
identify event, sending the user name so the client can associate the user
with the connection. After identifying, we set the connected$ observable to
true to indicate we have a connection.
The disconnect event also runs automatically upon disconnection, and here we
set the connected$ back to false.
At the end of the constructor, we check to see if we currently have a user name
set in local storage. If so, we grab it and call the connect method. This
allows the browser to refresh or the user to return later and get back into the
chat room without having to fill out their name again.
The connect method is called from the app component, which passes in the user.
If the client is currently connected, we return early as there's nothing to do.
If not, we set the user in local storage, update the user$ observable with the
user name, and initiate a socket connection.
The disconnect method clears the local storage, disconnects the client, and
sets the user to blank.
AppComponent
There are sections of the app component already set up for you. Update the highlighted lines:
import { Component, OnInit } from '@angular/core';
import { Observable } from 'rxjs';
import { ChatAppData, ChatService } from './chat.service';

export class AppComponent implements OnInit {
  message = '';
  user = '';
  chatAppData$!: Observable<ChatAppData>;

  constructor(private chatService: ChatService) {}

  ngOnInit(): void {
    this.chatAppData$ = this.chatService.getChatAppData();
  }

  connect() {
    if (this.user) {
      this.chatService.connect(this.user);
    }
  }

  disconnect() {
    this.user = '';
    this.chatService.disconnect();
  }

  sendMessage() {}
}
Hopefully, this section is fairly straightforward. We set up a chatAppData$
observable, and grab it from the chatService. The connect and disconnect
methods are bound to buttons in the template, and the existing message and
user variables are bound to text inputs.
AppComponent Template
Now it's time to update the template.
At the top, update the ng-container method to set its ngIf statement to bind
to chatAppData. We'll use the async pipe to subscribe to the observable and
alias its return value to data, which we will use throughout the rest of the
template.
<ng-container *ngIf="chatAppData$ | async as data">
On the next line, update the ngIf on the div tag to display if
data.connected is true:
<div *ngIf="data.connected; else login">
This displays the chat interface if the user is connected, else it displays the connect form.
Next, update line 24 to display the name of the user instead of the hard coded text 'user':
<div class="user">Welcome {{ data.user }}, Room room</div>
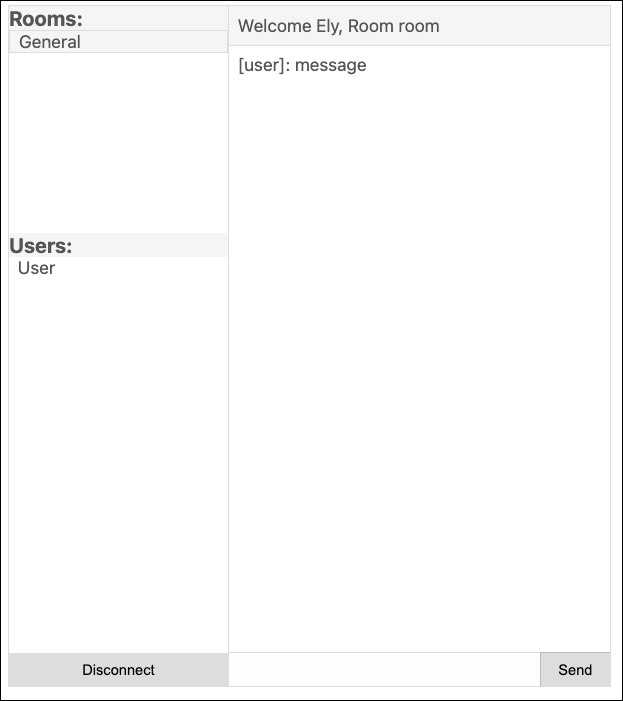
When you visit the app, you should be able to login/connect and see your name in the welcome message. Reload the page and notice how you stay logged in (thanks to the local storage variable). Clicking the disconnect button should return you to the login screen.
That was quite a bit of work to get up and running, but it was the bulk of the heavy lifting in getting clients connected and tracking them. Next up, we will see how we can have users join and leave various rooms in the app.